Fitting a Winch to a MY19 Discovery 5
Components Used
Hidden Winch Tray
Lucky 8 Proud Rhino Hidden Winch – I specifically asked for the model that had been slightly modified to fit the MY19 model. I know someone who had a tray from 2018 that struggled to fit the MY19 vehicle. Email communications with Lucky8 ensured the correct tray was sent.
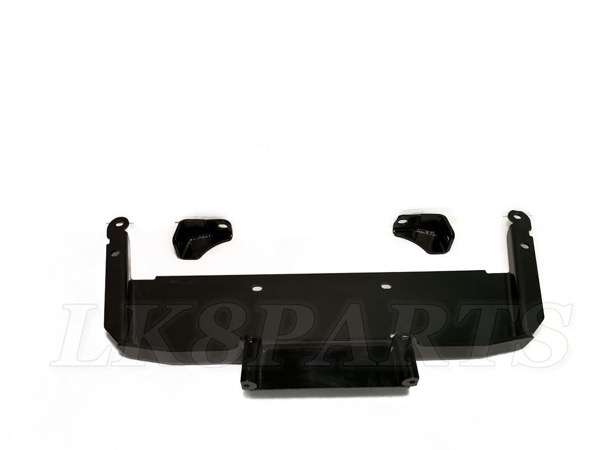
This is what arrived exactly. No bolts etc. As it turns out… you don’t need any. You will see later.
Winch
Domin8r x 12,000lb Winch with synthetic rope. – Note that as of 2020 there are two two Domin8r winches available. The one pictures and the Extreme. The extreme has an improved brake system and on inspection was a little larger in height. Because of this and the fact that I had seen images of the “standard” or orange rope version installed on this exact fit, I went for the standard version.
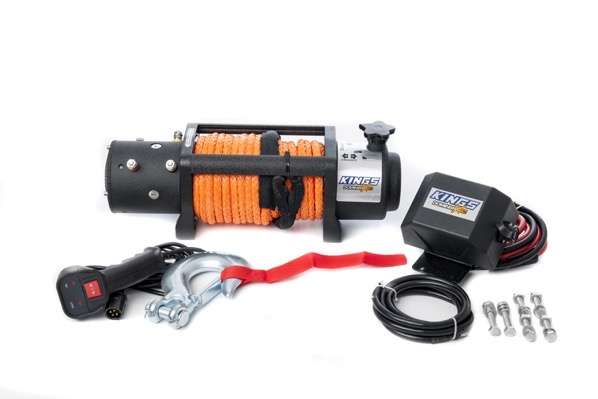
Pictured is exactly what arrived in the box.
I did consider a Warn which, however the price is literally 10 times the cost of this kings winch. And the fact that my Discovery while used hard will never be an extreme 4×4. The winch I am fitting servers two purposes for me.
1. It lets me explore tracks and go “down” places without the anxiety of getting stuck.
2. It lets me recover myself and others more easily that perhaps I would without the winch option.
In all honestly, on my previous LR’s fitted with a winch, I only ever used it twice and both times could have used other options. But I did find the comfort of knowing it was there completely changed how willing I was to explore hard tracks alone.
So the cheaper winch, it it only works a handful of times will suite me fine!
Which Options
I added the wireless which controller option to allow me to use the controller at the wheel without wires.
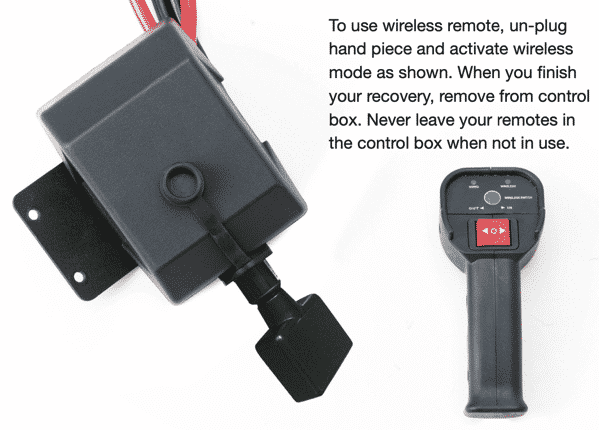
You can see that there is a dongle that plugs into the control box, and the remote that confusingly comes with wires, but the can be removed.
Fairlead
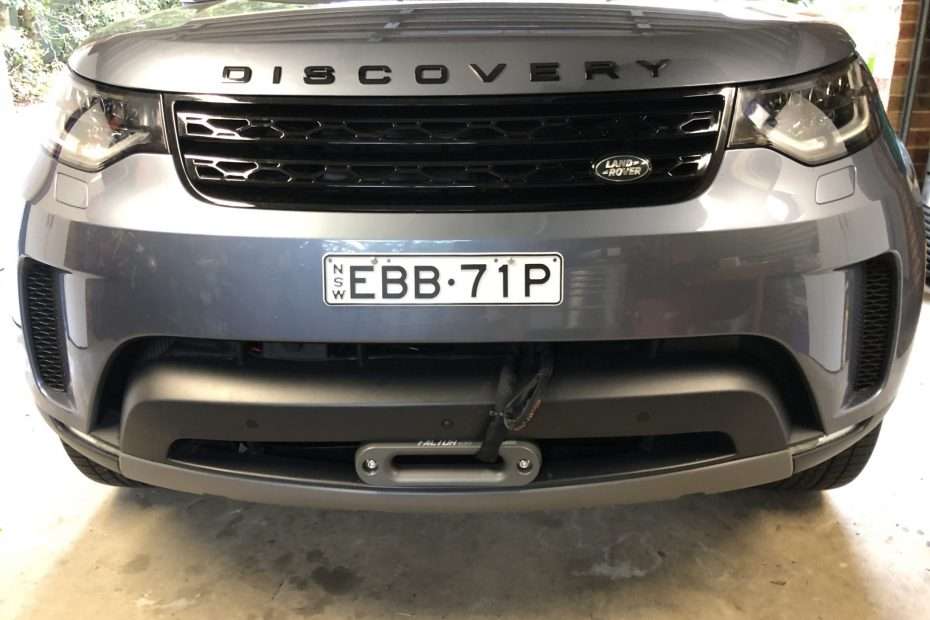
Factor 55 1.0 Grey Fairlead
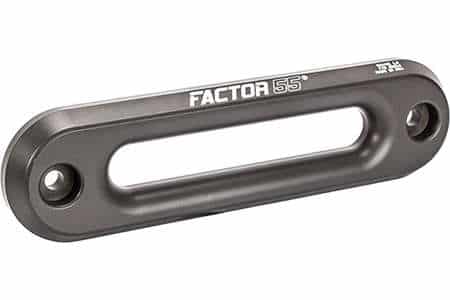
Fairlead Screws
1.5” 5/8 screws with Hex Heads and a couple of washers.

3M Automotive double sided tape.

This tape is used to refit the side strips around the wheel arches.
The Job
Remove the Discovery 5 Bumper Bar and front trimmings.
This for my was by fat the hardest part of the job. Knowing where to screw and pull to unclip and remove the bumper was not something I could do alone. So I enlisted a Landrover Mechanic (Tom) to assist me on the removal and refitting of the bumper. Super handy having him there to do it professionally. Total time to remove was about 40 minutes.

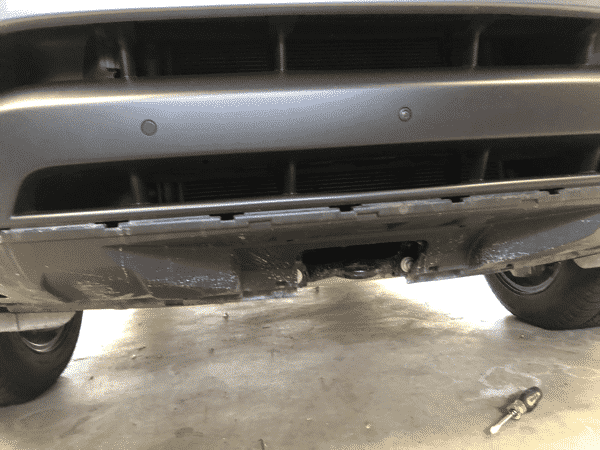
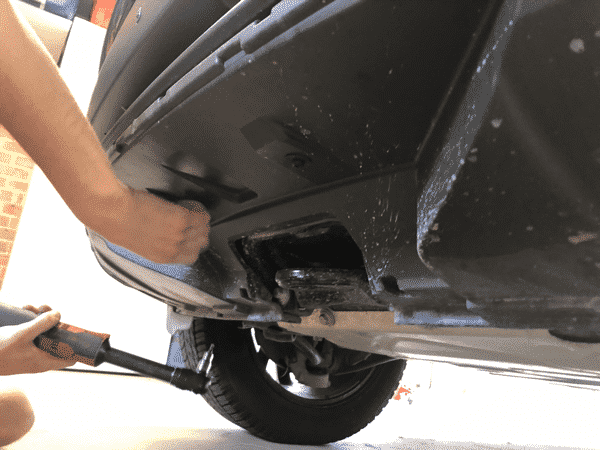

Not really going to try and describe the steps to remove the bumper. After seeing it done, I don’t think I would attempt it again without help. There is a bit to it. But some interesting steps included….
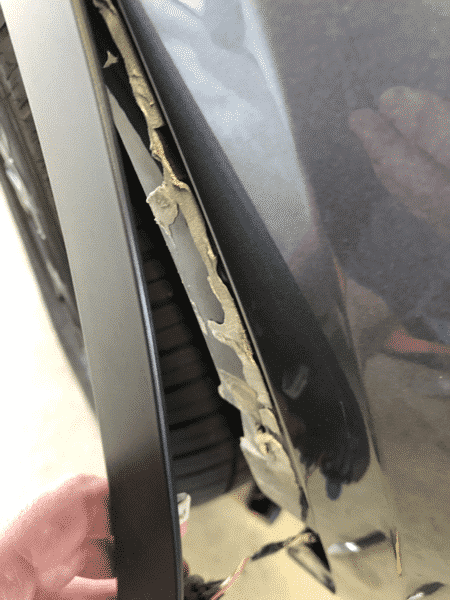
Removing the side strips around the wheel arches required carefully prying the double sided tape off, and disconnecting the sensor plugs. We used the 3M double sided tape to fix them back on.

The front radar sensor fitted the the cross bar. This is the bar that will be hacked into to make room for the winch.
Note the plastic dieting trim at the top and bottom of this image. They effectively directed air through the radiator. We managed to keep the top, but the bottom had do go.

This front scoops here are to direct air onto the brakes. We managed to refit these after the tray was added.

Removing the bottom plastic air direction housing.
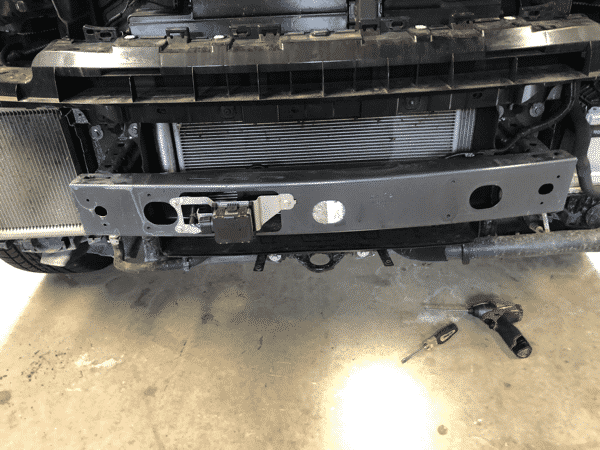
With it removed.

You will notes that there is still a plastic scoop at the bottom. We cut this off wish industrial scissors that made easy work of the plastic.

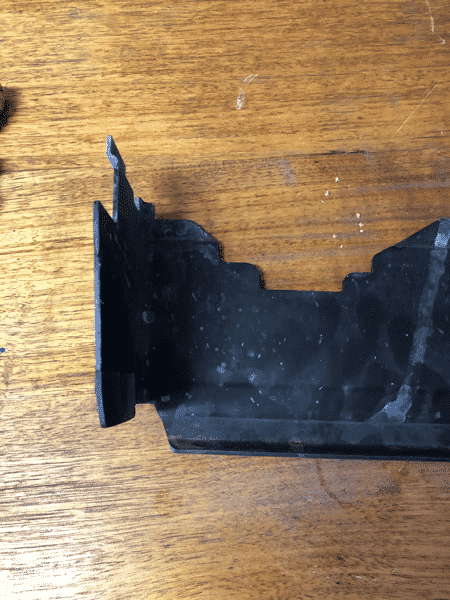

This is the cut away bottom plastic air duct. Both sides shown here to assist you with how much to cut.

We decided to unplug the cooling pipes to give us more room. We saved and used again the cooling fluid.

This hose in the middle frame was one that was tricky to fit back. You can see in this image that the tray is in place, although not tight. The hose comes around the tray and would rub on the tray. We decided to fit a foam block between the hose and the lucky8 tray. Something like a pool noodle cut to size would work well here. Something that fit around the host, but between it and there tray to ensure that vibration stays away.

Now this is not a picture of my bar. And I cannot believe it that I did not take a picture of the cuts we made before fitting the winch tray and winch. But we effectively made the same cuts as were made here, but did not remove the bar from the car to do it. Simply cut with the bar fixed to the car. The cuts were not hard, and worked well with a standard angle grinder. A couple of things to note in this.
1. The bar is much more sturdy than it looks here.
2. The middle remaining square bracket is to allow fitting of the radar back in place.
3. The cut on the back o the bar on the right side, needs to be a little angled to the right. i.e making some more room on the back right bottom.

The end result with our bar. Note again the cuts in the bar. The winch in place.
You will also note that we fitted the control box with the plug sitting forward. This worked very well and allowed some of the cables to come forward of the bar, and some to go behind the bar. To fix the control box we simply straightened the mounting bracket in a vice, then drilled a couple of holes through the bracket and bar then fixed it with some metal tapper screws.
Note the alignment of the box plug just to the right in the image of the screw holes below. This allows the box to be accessed from the front through the grill once the bumper is reattached.
Winch orientation is important. Note that the direction we have the winch allows the winch rope to run in on the bottom of the winch. I have seen the winch fitted the other way around, but this means that “in” on the controller will wind the rope on the top of the drum. Note idea for winches as it puts more moment on the attaching bolts. We found that fitting the winch this orientation worked fine.
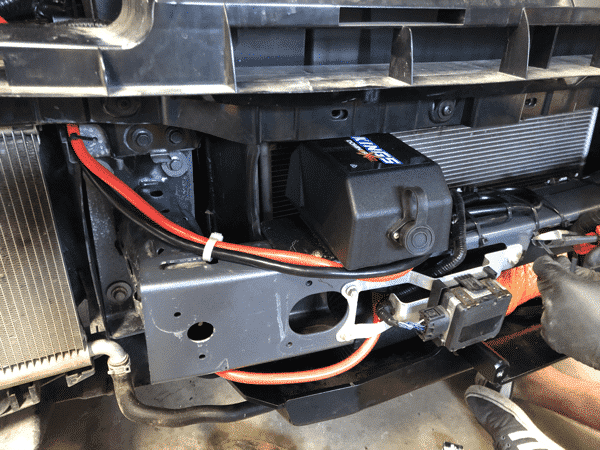
The cables were easy. Two leads gong back through the front assembly to the right are fixed to the jump points in the car. The red cable that loops back from the control box and under the cross bar, that you see on the bottom of this image is actually visible from the front of the car. So fitting a black or shrink wrap here would discuss that better.
You can see here too the radar fitted back in place and the winch cables zip tied to the top of the cross bar to keep excess cables from rubbing around the place. It is also interesting that the zip ties are visible from the front, so we used black to make it cleaner from the front view.

The mounting brackets took a bit of playing around with to get them orientated correctly. When we did, it all fit well and was obvious. This pic shows the orientation dangling down. We swing them into place 180 deg and use the winch bolts to fit them up through the tray and into the winch.
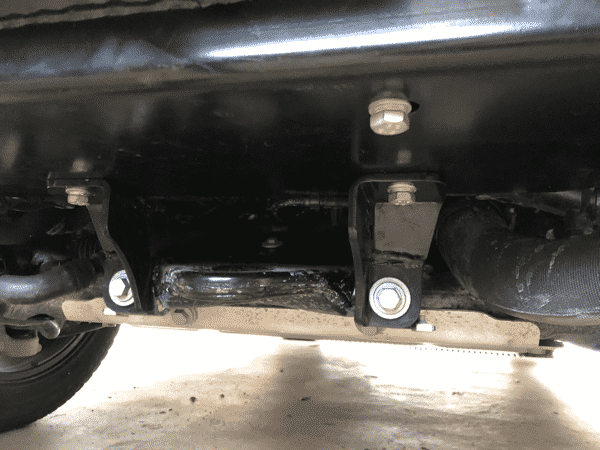

You can see here that the bolts going up through the tray are the Domin8tor winch bolts that came with the winch. They go up through the winch brackets and tray and into the winch mounting lugs.
The direction of the brackets works well in this orientation. We tried to have the brackets the other way around to put the bracket angel mount outwards for better strength. However we found they would not fit in that orientation. But we are happy with the result here.
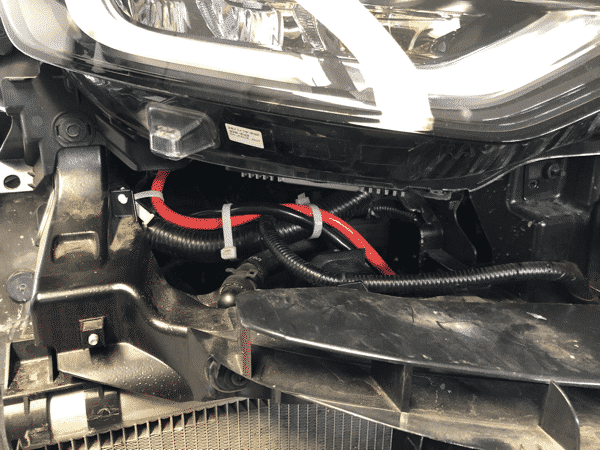
The cables that come up behind the light assembly.

Then run up over the air box

And fitted beneath the jumper mounts.
We did consider fitting them to the winch mount (that comes on the discovery) that is behind the front right wheel guard, and it would have worked. But the problem is that the Domin8tor winch has the in lead fuse that you can see in this image. There would be no way of easy access to that fuse if fitted to the winch mount. So we elected to fit it here. With zip ties it is very sturdy and works well.
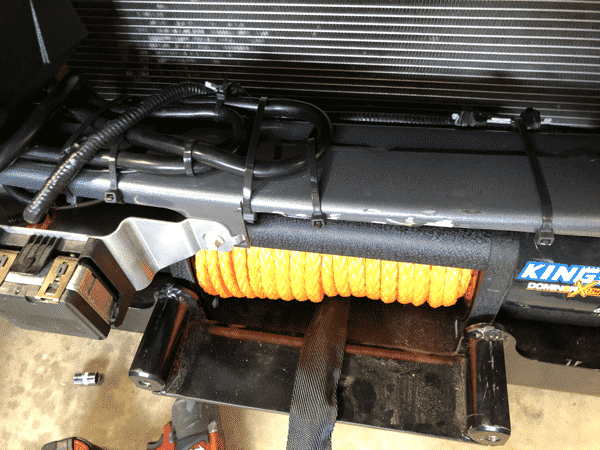
This picture shows the winch cables zip tied in place, but also the car cabling tied back over the top of our work.
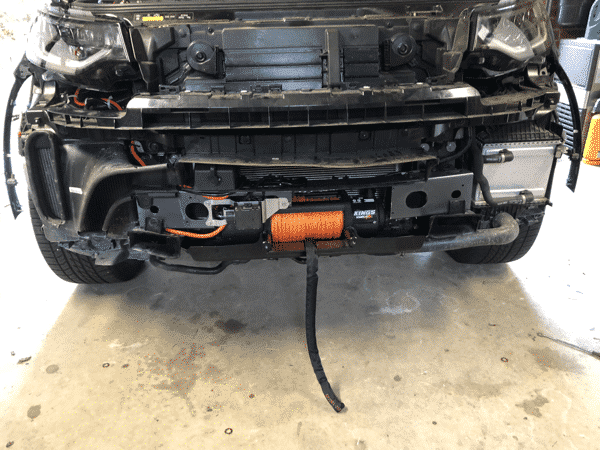
The end result before the bumper was attached again.
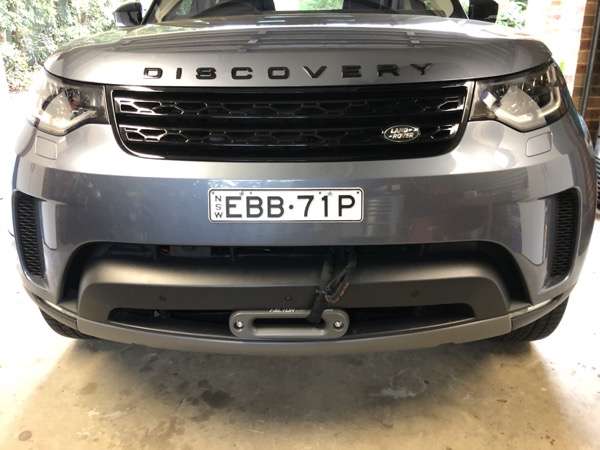
With the bumper fitted and the winch rope just temporarily zip tied out the way.

To get the factor 55 1.0 fair lead to fit, we need to make two cuts to the bumper just either side of the fairlead. The cuts are to the vertical plastic moulding. We made the cuts at the bottom and just screwed the factor 55 fairlead inlace while holding the plastic open using a bit of bruit strength.
The result is that the bumper splits a little wider around the fairlead and is a little deformed from its original shape. But the end result is that the fairlead sticks out a little giving good clearance for the rope to stay away from the bumper, and the whole thing looks good from the front. We made the cuts with a multi tool in about 5 seconds. Easy work.
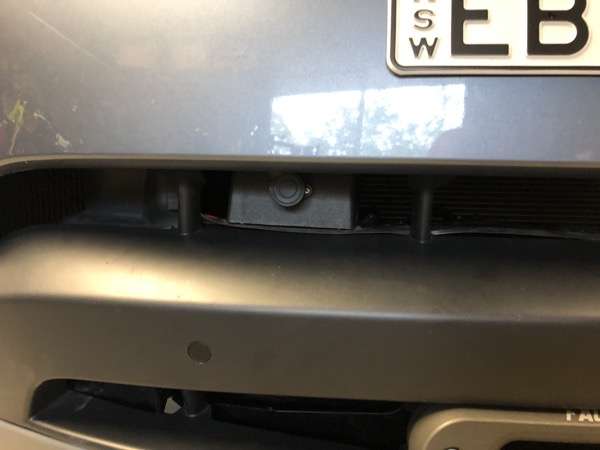
Not the control box is still accessible from the front, but mostly hidden. The wireless dongle sits really nicely in place and could be left there for a day out with a bit of winch work anticipated.
Like to thank
Paul Muscat for running the LR D5 Group.
Rob Morley for sharing his similar fit and answering my many questions.
Tom – The Landrover guru who helped with the bumper and whole job
Darub Abrahams – Who shared his experience with the older tray and some of the notes that helped with my decision making.
This is a Landrover Manual extract that talks about their winch fitting option that they never released. I referenced this a bit, but this blog post would be more help to anyone doing the same thing.
If you live in Sydney and want a Landrover mechanic to assist you with this winch combination, then please contact me. Tom would be only too happy to help.
Hi David,
Great article, detail and photos.
I have ordered the same tray expecting to receive it in the next week or two.
I would appreciate if I can contact you for some questions and also if you can pass Tom’s details who you mentioned in this article.
Thank you
Mason
That will be fine. Contact me on Facebook under the D5 Group. I have a link to this blog, so you should be able to fine me. DF.
What do you figure the costs were for the winch, tray, etc, minus labor. I’m in New York, US, and thinking of having it done.
Thanks
The lucky 8 winch tray is $888 USD https://lucky8llc.com/products/hidden-winch-tray
And the winch I used is about $650 AUD with a wireless remote.
All up around $1200 USD.
Thanks, appreciate the reply.
Hi David,
Thanks for putting this together, great work!
As a result your of this post I have also purchased the lucky 8 discovery winch for my 2019 D5.
I would like to enlist the services of the Tom the Land Rover guru to assist in the install.
How do I get in touch?
Ps I live in Sydney
Kind regards
Matthew
Hi Matthew, Glad it has helped you. Tom can be reached at his own Landrover Mobile Mechanic page here: https://roverx.com.au Just use the phone contact from that page to get him directly.
Wunderbar!!
hi Matthew
reading this article about getting a winch fitted to D5 , did you complete the process ?
we have a D5 and working thru the same