Skip to content

E-mail Tips

Website Developer Sydney

iPhone Add Email Account Exchange asks to sign in to Office 365

Office 365 sign in prompt when setting up Exchange email account on iPad, iPhone or Mac Mail The issue arrives when you are attempting to configure a new exchange account that is not hosted on office 365 but you keep getting a prompt to sign into office 365 mail account when you attempt to add a new account for a domain. The can be very confusing as if you have host your own services, or have a host that knows what they are doing, you can have an exchange email account that is not part of office 356 but yet you will see the prompt for sign into office 365 when attempting to set up the account on apple devices. It could well be that it also prompts with non apple devices, we did not bother to test. The issue likely arises from the situation where office 365 services were… Read More »iPhone Add Email Account Exchange asks to sign in to Office 365

Website Developer Sydney

SmarterMail Email Setup on iPhone (IMAP) – InteractiveWebs

Setting up an iPhone for SmarterMail InteractiveWebs Email (IMAP) There are multiple ways you can connect to your InteractiveWebs email account. These methods include, POP3, IMAP, or EXCHANGE. This method covers the IMAP connection method.   What you will need: Your Email address: example@email.com (not that the email address is also your user name) Your Email Account Password In this example we are using iOS 14, and roverx.com.au as the domain with “servcie” being the email address. Note too that we have “Dark Mode” enabled for a black background look. Yours may look a little different. Open you iPhone and Select the Settings Icon Navigate to Mail Select Accounts   Select Add Account We are going to set this up as an IMAP account. To do this we need to select “Other” from the Add Account List. Select Add Mail Account Enter Your Name Enter the email address we provided… Read More »SmarterMail Email Setup on iPhone (IMAP) – InteractiveWebs

Website Developer Sydney

How Clear Cache in Mautic 3x in cPanel

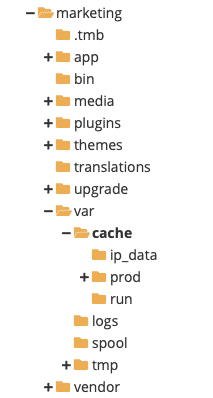
How Clear Cache in Mautic 3x in cPanel So if you are working with Mautic 3.1 like we are as of today, and you are installing modules that connect to the Mautic API, you will find that after you make Custom Fields Editable Or Enable the API for Mautic in CONFIGURATION / API SETTINGS   That you will then need to clear the Cache directory of Mautic before your other Applications will be able to connect to the API. Now we are using cPanel and have access in there to the File manager. Easier than running an SSH command is to go into the director: var/cache in the Mautic directory. In our case here we have it in a directory or folder named marketing. You will see a bunch of files here like this: Just delete all of these files from the cache folder.  That’s it. You should then be… Read More »How Clear Cache in Mautic 3x in cPanel

Website Developer Sydney

How To Fix – SPF Too many included lookups Failure

The Solution to the 10 DNS Query Limit with SPF records. How To Fix – SPF Too many included lookups Failure. The problem you may have is something like this. You use a tool like our two favourite tools here: 1. MXToolbox SPF Checker 2. DMARCLY SPF Tool And they return the error that you have: Too many included lookups (16) Or The SPF record exceeds the 10 DNS query limit, which results in deteriorated email deliverability. Use DMARCLY’s Safe SPF feature to fix this issue. This error is generated by your SPF record referring more than 10 times to look up a DNS record while resolving your SPF record. You can look around the web a bit more for why this limit is in place, but you need to know that if you SPF record fails with these types of messages when testing, that the entire SPF record is… Read More »How To Fix – SPF Too many included lookups Failure

Website Developer Sydney

Mautic Email with Button that Links Contact Email to Pre-populates Email Form

Mautic Email with Button that Links Contact Email to Pre-populates Email Form The goal here is actually a little more complex. Essentially what we’re trying to do is to take some pre-populated contact details that we have entered into Mautic as a method of making initial contact. For example this might be simply entering an email to generate a contact inside of the application. What we would like to do however is to drive the recipient of the email through a web form to fill out additional data that will then be collected back into the initial contact record inside the program. This is actually quite easy to do, it does however require that you use the email field as a way of linking. the following instructions explain it quite clearly. First you need to create a form and make sure that you add the email field. If you don’t… Read More »Mautic Email with Button that Links Contact Email to Pre-populates Email Form

Website Developer Sydney

Mautic 3.1 SES API Setup for Sending

How to Change Mautic Settings to SES API from SES SMTP Assuming that you have setup Mautic to send email messages using Amazon SES, you may have noticed that Mautic 3.1 now includes the ability to send using the AWS SES API rather than the SES SMTP for sending. The advantage this offers is simply the speed that you can blast out. The SES API is reportedly 14 X faster for sending emails than the SMTP service. We originally followed this video: Send Marketing Emails For Basically Zero Dollars – Mautic + AWS SES Which frankly is terrific for setting ups SES in Mautic After Upgrading to Mautic 3.1 After you run the update to Mautic 3.1 it is time to setup access in your AWS SES for API access. If you are using Amazon SES in us-west-2 as we are, then you simply go to this address. https://console.aws.amazon.com/iam/home?region=us-west-2#/users$new?step=details Enter… Read More »Mautic 3.1 SES API Setup for Sending

Changing SMTP Port 25 to a non blocked port

How to Change Port 25 in your email client Sometime your ISP will block port 25 and prevent you from sending SMTP email on that port. Your email service provider may ask you to change the port being used to something other than port 25.   Most email programs have configuration settings like this: Where on the Advanced Tab or similar depending on the email program in question there are settings for the outgoing SMTP server. To change the SMTP port from 25 to 587 for example you just replace this: Click OK and you are done. Note: It should be noted that the port number to use must be provided to you by your Email ISP.

SmarterMail Automatic Reply Email Message

Setup Auto Reply (Auto-Responder) in SmarterMail To configure Auto-Reply in SmarterMail, you login to the webmail account you wish to setup a reply for. https://mail.interactivewebs.com Login with the email address of the account in question, and the password provided. Then Select Settings / autoresponder Select the Enable auto-responder / then the Auto-Responder Message tab Type your Subject / Message Then click Save, and you are done!

SmarterMail Autodiscover setup configuration

Setup of SmarterMail Autodiscover configuration A simple understanding of autodiscover is that it is the configuration necessary to allow advanced email programs like macmail and outlook to configure themselves with only an email address and password. No more telling clients all the server settings necessary to get them all setup. At least that is the theory. Exchange server has supported it for some time, but configuration under a multi domain setup is a total pain in the butt. Typical off MS to dream something up, then balls it up in the implementation. SmarterMail does a much better job of it. Configuration is virtually non existent, it basically just works. http://portal.smartertools.com/KB/a2415/set-up-auto-discovery-with-smartermail.aspx But their article is a little skimp for the non server admins.. so this is a step through course. Assuming that you are using Microsoft DNS server for your DNS hosting (and I realise that most probably don’t but it… Read More »SmarterMail Autodiscover setup configuration

SmarterMail Setup Anti-Spam Tools and Tips

E-Mail Anti-Spam Settings – Using Only SmarterMail Anti-Spam Tools and No Wizard Beginning with SmarterMail 6, SmarterTools began incorporating some very powerful tools into the SmarterMail e-mail server software which made the control of undesired SPAM much easier. Prior to version 6 of the SmarterMail software, it was necessary to maintain blacklists, build complicated tables of undesired words, phrases, IP address, e-mail addresses, and domains – all of which changed almost every hour. The spammers knew the ISPs and e-mail server operators were up against a wall and, in spite of new state and federal regulations being put into place almost daily, continued to churn out ever more junk mail because they were unconcerned with being stopped or caught. With the introduction of SmarterMail version 6, the tide began to turn in favor of the e-mail server operators. Between the more frequent adaptation of SPF, the general requirement of large… Read More »SmarterMail Setup Anti-Spam Tools and Tips

SMTP Authentication–I Can Only Send Email to My Domain

One of the most common problems experienced by users of hosted email services is that they find they can only send email messages to their own domain. For Example, if you have two hosted email addresses: ted@mybusiness.com john@mybusiness.com You find that you can successfully send an email message from one user to another, but when you try to send to any other domain: anything@hotmail.com You find that the email messages do not send. Solution You need to enable “Authentication” in your configured email account settings. There are many client email programs, probably the most common is Outlook. When you configure an new POP3 email account you normally end up with something that looks like this: If you click on More Settings / Outgoing Server and just tick the option to use the same settings as the incoming mail server. This is all that is needed to enable outbound SMTP authentication.… Read More »SMTP Authentication–I Can Only Send Email to My Domain

How to turn off NDR’s in Exchange 2003

Understanding non-delivery reports NDR or Non Delivery Reports are potentially a great way of telling a user that they made a typo with an email address and that the email could not be delivered. In a 1999 world, this would be fine. However we are in a world now where email servers are flooded with spam, and lots of it, replying to every junk email that is hitting all the imaginary email addresses on your server (support@, admin@ help@ etc) is not a good idea, and it causes what is known as backscatter. To avoid this back scatter of invalid email delivery from your server it is recommended that you turn off your Non Delivery Reports NDR. To do this in Exchange 2003 you need to perform the folloing: 1. Open Exchange System Manager 2. Expand Global Setting and Click on Internet Message Formats 3. In the right hand pane,… Read More »How to turn off NDR’s in Exchange 2003